Wednesday, December 1, 2010

Watercolored Cute Christmas


Here's a card I made for a Christmas Stamp-a-Stack class I held in November.  The trees are watercolored using markers that are scribbled on an acrylic block then the colors are picked up with an aqua painter.  This is one of my favorite methods of watercoloring.  I learned it at a Rubber Stamp convention and have adopted it ever since.

Stampin' Up Supplies Used:

Stamps:  A Cute Christmas, Sparkly & Bright
Paper:  Candy Cane Christmas DSP, Real Red
Ink:  Basic Black
Accessories:  Markers - Baja Breeze, River Rock, Pear Pizzazz, Old Olive, Peach Parfait and Real Red, Aqua Painter

Monday, November 29, 2010

Christmas Tags


Has it been 2 months since my last post?!?  Where has the time gone?  In early October, I took a 2 week vacation to Italy and after I got back, I started experiencing camera problems.  As I was debating whether to buy a replacement, my camera suddenly decided to started working again.  So I'm back in the blogging business.

I've been teaching a lot of classes during my 2 month blogging absence.  These Christmas tags are examples of what I'll be teaching this Saturday for my Bags 'o Tags class.

Stampin' Up Supplies Used:

Stamps:  A Cute Christmas, Sparkly & Bright, Contempo Christmas
Paper:  Real Red, Old Olive, Bashful Blue, Whisper White, Crumb Cake, Wild Wasabi, Kiwi Kiss, Early Espresso, Baja Breeze, Brushed Silver
Ink:  Real Red, Old Olive, Basic Black, Wild Wasabi, Early Espresso
Accessories:  1 3/4" and 2 3/8" Scallop Circle Punches, 1" and 1 3/4" Circle Punches, Timeless Type Alphabet, Round Tab Punch, Snowflakes Set #2, Basic Rhinestones 


Tuesday, October 5, 2010

Stampin' Up Clearance Rack


Stampin' Up just announced a Clearance Rack promotion.  From Oct 5 - 18, you can buy discontinued merchandise for up to 80% off!  Products are available to order online and qualifying orders are eligible for Hostess benefits (Hostess benefits given with minimum $150 merchandise total order).  If you didn't get a chance to stock up on discontinued paper, inks, accessories or other merchandise, now is your chance!  Hurry, supplies available while they last and all sales are final.

To place an online order, click here.

Friday, October 1, 2010

Enjoy Every Moment Blog Tour


For those of you arriving here via Mercedes Weber's blog, welcome! Mercedes is part of the monthly Stamp 'n Chat group I attend and she is a super stamper.  I always look forward to seeing what Mercedes creates.  I'm so thrilled to be a part of the Enjoy Every Moment Blog Tour. All this week I've been posting Halloween treat packaging ideas. Today's post is the highlight culminating the end of Treat Week and I saved the best for last. Here are 3 unique packaging ideas using mainly Sizzix dies, all exclusive to Stampin' Up.


Front View


Back View

The Haunted Tombstone treat is made with the Matchbox die.  I ran the slider portion thru the Spider Web embossing folder, then sponged with Whisper White Craft ink to really pop the web and give it an eerie, spooky effect.  The sides of the "tombstone" are lined with manicured "grass" which are just strips of snipped Old Olive cardstock.  "RIP" was die cut from the Timeless Type Sizzix Sizzlits Alphabet set and the little bat is from the stamp set Fang-tastic.  I stamped it first in Whisper White Craft ink and then hand cut it.  Lastly the gigantic full moon is punched with the 1 3/4" circle punch.

The middle treat is made with two Basic Black panels cut to 4.25" x 5.5" which are attached to a small paper bag.  I wheeled Frightful Fence using Versamark ink and then heat set with clear embossing powder.  Then I sponged Whisper White Craft ink again to create a cloudy Halloween nite scene.  The full moon is punched with the 1 3/8" circle punch and the witch, sentiment and pumpkin on the flip side are also from the Fang-tastic stamp set.

Lastly the abandoned Haunted House is made with the Milk Carton die.  The roof is just rows of Basic Gray cardstock punched with the Scallop Edge Border punch.  The door is a Word Window punch cut on one end to form a straight edge for the bottom.  The boarded up windows are made of 1/8" strips of Crumb Cake.  The black fence is a Martha Stewart border punch.

I hope you are inspired to create some of these Halloween treats!  The next person on the Enjoy Every Moment Blog Tour is the talented Brenda Keenan; I've been lucky enough to receive some of her swaps at Convention.


Wednesday, September 29, 2010

Trick or Treat Smell My Feet


Welcome to Day 3 of Treat Week.  Today's Peppermint Patty treat is encased in a holder made from the Sizzix Two Tags die exclusive to Stampin' Up.  The lovely witch's feet is from the stamp set Wicked Cool and I paper pieced the Rich Razzleberry stockings.  I was really surprised when I opened the bag of Peppermint Patties and discovered that the candy wrapping had changed.  I wanted neatly wrapped circular candies but found a four-sided treat instead; thus the treat is peeping out from within its packaging.


Stampin' Up Supplies Used:

Stamps:  Wicked Cool
Ink:  Basic Black, Rich Razzleberry
Paper:  Old Olive, Whisper White, Wicked Fun DSP
Accessories:  Scallop Punch, 1 3/8" Circle Punch, 1/8" Taffeta Ribbon Black, Cropadile

Tuesday, September 28, 2010

Mummy Dearest


Day 2 of Halloween Treat Week.  The mummy wrapped chocolate bar is not a new idea, but this is my take on it.  There's no stamping and very few accessories used.  Aside from cutting lots of strips of white paper in varying widths, this treat is easy to mass produce.  Start by cutting a piece of white cardstock to 6"x6".  Score at 2", 2.25", 4.75" and 5".  Fold at all score lines and use sticky strip on one end to create the little mummy "jacket".  Then make the eyes before wrapping with strips of white cardstock.  Lastly, I used yummy Peach Parfait ribbon to pull the hidden Hershey bar from its mummy wrap.

Stampin' Up Supplies Used:

Stamps:  None
Ink:  None
Paper:  Whisper White, Basic Black
Accessories:  Peach Parfait Poly Ribbon, Circle Punches:  1/2" and 1/4", Slot Punch (Retired)

Monday, September 27, 2010

Treat Week Begins!


I'm kicking off a week of Halloween treat ideas culminating with Friday's blog hop!  This treat is a pillow box cut out of heavy-duty clear sheets.  Tip:  I discovered that using a crease pad gives a cleaner cut and very visible crease lines when using thick plastic sheets.  The adorable vampire is from the stamp set Fang-tastic; isn't the accompanying greeting perfect?  It's hard to tell but I watercolored his face with Concord Crush; I know, it looks like he's got a gray, ashen face.

Stay tuned tomorrow for another Halloween treat idea.

Stampin' Up Supplies Used:

Stamps:  Fang-tastic
Ink:  Concord Crush, Rich Razzleberry, Old Olive, Peach Parfait, Basic Black
Paper:  Wicked Cool DSP, Basic Gray, Whisper White
Accessories:  Pillow Box Die, Circle Punches:  1 3/8" and 1 1/4", Stampin' Dimensionals

Friday, September 24, 2010

Easy Peasy Cards


You can't get any cleaner and simpler than these two cards.  I whipped these up for two birthdays I celebrated last weekend.  I stamped the greeting and then carefully chose the optimal spot to punch.  Notice I like having the word "cake" visible in both cards.

Have a wonderful weekend everybody!  We're expected to have a heat spell - Indian summer has arrived now that it's fall. 


Stampin' Up Supplies Used:

Stamps:  Everything Nice, Birthday Bliss
Ink:  Early Espresso
Paper:  Peach Parfait, Blushing Bride, Hostess Level 1 In Color DSP Pack
Accessories:  1" Circle Punch, Stampin' Dimensionals

Wednesday, September 22, 2010

Shabby Chic Bedroom


I cased this great card on the Splitcoaststampers site, a stamping community on the internet where people can share cards and projects with other stamping enthusiasts.  It's hard to see but the "wall" on my card has been scored to simulate bead board.  The striped "wallpaper" is from the Level 1 Hostess In Color DSP pack.  The base of the dresser was created with the new Decorative Label punch available in the Holiday Mini Catalog.  The drawers are the Modern Label punch jazzed up with Basic Rhinestone knobs and stamped with an image from the Artistic Etchings set.  There's a peek of something "lacy" in the open drawer.  And what Shabby Chic bedroom wouldn't be complete without a chandelier?  This one is from the retired set Grand Soiree.

Stampin' Up Supplies Used:

Stamps:  Artistic Etchings, Grand Soiree (Retired)
Ink:  Blushing Bride, Basic Black
Paper:  Whisper White, Level 1 Hostess In Color DSP Pack
Accessories:  Decorative Label Punch, Modern Label Extra Large Punch, Basic Rhinestones, Victoria Lace Ribbon

Tuesday, September 21, 2010

Get Ready for Fall


This is one of the cards I gave my sister-in-law as her birthday present.  Fall isn't quite quite here yet, but I've already transitioned in my mind.  Actually we never had a full-fledged summer here in Northern CA; it stayed pleasantly cool and comfortable.  

This card uses a retired stamp set called Branch Out.  I loved that set and wish it hadn't retired so soon.  Have you heard of a product called Flower Soft?  The Fall blend makes this tree come alive as if it is part of a tranquil scene in New England during leaf peeping season.  The muddy red boots and tire swing complete the scene.

Stampin' Up Supplies Used:

Stamps:  Branch Out (Retired), A Little Birthday Cheer (Retired)
Ink:  Early Espresso, Cherry Cobbler, Basic Black
Paper:  Early Espresso, Whisper White, Old Olive
Accessories:  Early Espresso Marker, Square Lattice Embossing Folder, Modern Label Extra-Large Punch

Monday, September 20, 2010

Faux Watercolor


I made this card for my sister-in-law's birthday which we celebrated this weekend.  I used the stamp set Inspired by Nature and colored the flower and stem with markers.  Before I stamped it on watercolor paper, I gave the stamp a light spritz of water and then stamped.  This technique gives the image a "watercolored" effect.  My favorite stamp set Afterthoughts is making its weekly appearance.  This card is 3.5" x 6".  I like this size; it's great for images that are long.

Stampin' Up Supplies Used:

Stamps:  Inspired by Nature, Afterthoughts, Tiny Tags
Ink:  Pink Pirouette, Pink Passion (Retired), Old Olive, Versamark, Early Espresso
Paper:  Pink Pirouette, Watercolor, Early Espresso
Accessories:  Linen Thread, White Embossing Powder, Jewelry Tag Medium Punch, Paper Piercer

Thursday, September 16, 2010

Coming Oct 1 - The Enjoy Every Moment Blog Tour!


I'm participating in my first ever blog tour!  Annette, the amazingly generous and talented leader of the Stamp 'n Chat group I participate in every month has organized a blog tour with nine Stampin' Up demonstrators.  Please mark your calendars and watch out for the tour on Oct 1!  I'm so excited and can't wait to unveil the projects I've been working on.


Tuesday, September 14, 2010

Have You Ever?


I saw this list of "Have You Evers" on a blog and thought it'd be fun to see how many things I've done.  This was a pretty eye-opening exercise.  It made me realize I've travelled a lot, but need to be more charitable.  The pictures above are from some of the trips I've taken.  I love the middle one which shows a jumble of signs at an intersection along a rural road in Vermont; it was taken during a fall leaf peeping trip I took last year.  So...how many of these things have you ever done?

Have you ever...


 1. Started your own blog
 2. Slept under the stars
 3. Played in a band
 4. Visited Hawaii
 5. Watched a meteor shower
 6. Given more than you can afford to charity
 7. Been to Disneyworld
 8. Climbed a mountain
 9. Held a praying mantis
10. Sang a solo
11. Bungee jumped
12. Visited Paris
13. Watched a lightning storm at sea or the beach
14. Taught yourself an art from scratch
15. Adopted a child
16. Had food poisoning
17. Walked to the top of the Statue of Liberty
18. Grown your own vegetables
19. Seen the Mona Lisa in France
20. Slept on an overnight train
21. Had a pillow fight
22. Hitch hiked
23. Taken a sick day when you’re not ill
24. Built a snow fort
25. Held a lamb
26. Gone skinny dipping
27. Run a Marathon
28. Ridden in a gondola in Venice
29. Seen a total eclipse
30. Watched a sunrise or sunset
31. Hit a home run
32. Been on a cruise
33. Seen Niagara Falls in person
34. Visited the birthplace of your ancestors
35. Seen an Amish community
36. Taught yourself a new language
37. Had enough money to be truly satisfied
38. Seen the Leaning Tower of Pisa in person
39. Gone rock climbing - does indoor rock climbing count?
40. Seen Michelangelo’s David in person
41. Sung karaoke
42. Seen Old Faithful geyser erupt in person
43. Bought a stranger a meal at a restaurant
44. Visited Africa
45. Walked on a beach by moonlight
46. Been transported in an ambulance
47. Had your portrait painted or drawn
48. Gone deep sea fishing
49. Seen the Sistine Chapel in person
50. Been to the top of the Eiffel Tower in Paris
51. Gone scuba diving or snorkeling
52. Kissed in the rain
53. Played in the mud
54. Gone to a drive-in theater
55. Been in a movie
56. Visited the Great Wall of China
57. Started a business
58. Taken a martial arts class
59. Visited Russia
60. Served at a soup kitchen
61. Sold Girl Scout Cookies
62. Gone whale watching
63. Got flowers for no reason
64. Donated blood, platelets, or plasma
65. Gone sky diving
66. Visited a Nazi Concentration Camp
67. Bounced a check
68. Flown in a helicopter or plane
69. Saved a favorite childhood toy
70. Visited the Lincoln Memorial
71. Eaten Caviar
72. Pieced a quilt
73. Stood in Times Square
74. Toured the Everglades
75. Been fired from a job
76. Seen the Changing of the Guards in London or Washington, D.C.
77. Broken a bone
78. Been on a motorcycle or four wheeler
79. Seen the Grand Canyon in person
80. Published a book
81. Visited the Vatican
82. Bought a brand new car
83. Walked in Jerusalem
84. Had your picture in the newspaper
85. Kissed a stranger at midnight on New Year's Eve
86. Visited the White House
87. Killed and prepared an animal for eating
88. Had chickenpox
89. Saved someone’s life
90. Sat on a jury
91. Met someone famous
92. Joined a book club
93. Lost a loved one
94. Had a baby
95. Seen the Alamo in person
96. Swam in the Great Salt Lake
97. Been involved in a law suit
98. Owned a cell phone
99. Been stung by a bee


Sew Cased


Wow, I finally made a non-graphic card without the Timeless Type Alphabet!  This card was inspired by this Hero Arts blog post.  I've actually wanted to make a card that involved some sewing so this was the perfect card to case.  I used the Stampin' Up set Morning Cup and hand sewed two lines to simulate the coffee pour.  The cup and coffee pot were watercolored.

Stampin' Up Supplies Used:

Stamps:  Morning Cup
Ink:  Basic Black, Daffodil Delight, Basic Gray, Cherry Cobbler
Paper:  Daffodil Delight, Kiwi Kiss (Retired), Baja Breeze, Whisper White, Level 1 In Color Hostess DSP Pack
Accessories:  Circle Punches - 3/4", 1" and 1 3/8", Stampin' Dimensionals

Monday, September 13, 2010

Take Ten


This card came together in less than ten minutes.  I had a bunch of punched circles lying around from a previous card idea.  I thought the circles would go well paired with a dark gray background.  Then I went to my favorite go-to Timeless Type alphabet set and voila! another quick, graphic card.  The "birthday" greeting is from the hostess set Afterthoughts and was heat embossed with white embossing powder.  I promise to get off the Timeless Type, Afterthoughts kick soon.  I can't help it though.  There's just so many ways to use both!

Stampin' Up Supplies Used:

Stamps:  Afterthoughts
Ink:  Versamark
Paper:  Basic Gray, Melon Mambo, Peach Parfait, Tempting Turquoise, Kiwi Kiss (Retired), Early Espresso, Whisper White
Accessories:  1" Circle Punch, White Embossing Powder

Friday, September 10, 2010

Stamp 'n Chat Halloween Treat


It's that time of the month again, my monthly Stamp 'n Chat with a group of talented local demonstrators.  Our theme this month was anything holiday.  I made a simple Halloween treat using the new Sizzix Candy Wrapper die.

Stampin' Up Supplies Used:

Stamps:  Halloween Hoot
Ink:  Rich Razzleberry, Basic Black
Paper:  Rich Razzleberry, Wicked Fun Specialty DSP, Whisper White, Basic Black
Accessories:  Sizzix Candy Wrapper Die, Circle Punches:  1 3/8" and 1 1/4", Raven 1/2" Lace Trim

Thursday, September 9, 2010

Circular Greeting


I'm making a stash of graphic simple cards to give to my friend for her birthday next week.  She's getting the two from yesterday's post; this'll be the 3rd design.  I traced a big circle in pencil and followed the outline to place the colorful dots; this wasn't a situation to wing the dot placements - I tried that at first and my circle was more like a wonky oval!

Stampin' Up Supplies Used:

Stamps:  Celebrations (Retired)
Ink:  Early Espresso
Paper:  Melon Mambo, Tempting Turquoise, Peach Parfait, Early Espresso, Pear Pizzazz
Accessories:  1/4" Circle Punch


Wednesday, September 8, 2010

Graphic Duo


Revisiting the bold and graphic design style with these two cards.  I masked the Happy Birthday stamp from the Hostess Level 1 set Afterthoughts so I could stamp it on one line vs two lines.  The striped card is made from scrap strips of Melon Mambo and Whisper White mounted on an Early Espresso background.  I've got a lot of birthdays coming up in September so building up my stash + want to give my friends cards as their birthday gift. 

Stampin' Up Supplies Used:

Stamps:  Afterthoughts
Ink:  Early Espresso
Paper:  Whisper White, Early Espresso, Melon Mambo, Crushed Curry (Retired)
Accessories:  Circle Punches:  1 1/4" and 1"


Tuesday, September 7, 2010

CAS FTL #106


Hope you all had a fun or relaxing Labor Day weekend.  I went camping for a few days and we had great weather all weekend; I think summer has finally arrived in the Bay Area! 

It's been a few weeks since I participated in the Clean and Simple Blog layout challenges.  I needed to make a Congratulations card for my friend Amy who's about to delliver twins.  I'm not sure what the sex of the twins are so I incorporated a little bit of blue, pink and green on this card to cover all the bases.

Stampin' Up Supplies Used:

Stamps:  Everything Nice
Paper:  Whisper White, Pink Pirouette, Pear Pizzazz, In Color DSP Pack (Level 1 Hostess), Marina Mist
Ink:  Soft Suede
Accessories:  Circle Punches 1 1/4" and 1 3/8", Stampin' Dimensionals, Billboard Decorative Strip

Friday, September 3, 2010

Bird Cage Card Holder


I couldn't resist this antiquey bird cage when I saw it at a store called Harvest Furniture in the Bay Area.  I even bought some vintage Paris postcards to display with it, but when I got the cage home, it ended up being a place to display all the cards I've been making to post on this blog.  I love that I've got a great stash of cards ready to give to my friends and family for their birthdays and celebrations. 

Have a great Labor Day Weekend!

Thursday, September 2, 2010

Trio of Simple Cards


The lunch notes box I created a few posts ago would be perfect to hold this trio of note cards.  The focal point of each card was cut with a Sizzix die.  The card to the far left is cut from the Table Setting die and uses the spiral circle.  I didn't use the entire spiral as the flower would have been too big; I cut the spiral about midway.  The flower is cut out of felt - wouldn't it be great to have felt in exclusive Stampin' Up colors?  Imagine the possibilities!  The middle card is die cut with the Flower, Daisies #2 die (one of my all-time favorites).  Lastly the card to the right uses the Beautiful Butterflies die.  Each of the stamped sayings is from the Level 1 Hostess Set Afterthoughts with the second line masked off.


Stampin' Up Supplies Used:

Stamps:  Level 1 Hostess Set Afterthoughts
Ink:  Early Espresso
Paper:  Crumb Cake, Baja Fresh, Wild Wasabi, Whisper White, Pink Pirouette, Level 1 In Color Hostess DSP Pack
Accessories:  Sizzix Dies:  Table Setting, Daisies #2, Beautiful Butterflies; Basic Rhinestones and Pearls, Button (Retired)


Wednesday, September 1, 2010

Ribbon Flower Favor Box


A few years ago at a Stampin' Up Convention, we learned how to make flowers out of ribbon.  You basically take a big needle (the kind used for cross stitching) and sew a running stitch at the top of the ribbon.  Then at the end, pull the thread so the ribbon ends up scrunching together.  Stitch a securing stitch at the bottom to close off the flower and you've got a simple, cute adornment to put on boxes, cards, etc.  I love, love, love the 1.25" striped ribbon. 

Stampin' Up Supplies Used:

Stamps:  Afterthoughts (Level 1 Hostess Set)
Ink:  Pumpkin Pie
Paper:  Crumb Cake, Confetti Cream, Baja Breeze
Accessories:  1 1/4" Pumpkin Pie Striped Grosgrain Ribbon, Bitty Box & Envelope Sizzix XL Die, Build-a-Brad, Linen Thread, 1/2" Circle Punch

Tuesday, August 31, 2010

Lunch Notes


I was browsing thru a Paper Source catalog and saw a box of lunch notes for sale.  It didn't show what the notes actually looked like, but I liked the box that contained them, so I decided to create my own box + notes.  This project requires no stamping; the images are cut from the Doodlecharms and Sweet Treats Cricut cartridges.  The box measures 4x4" and the notes are just slightly smaller than that.  I printed the sayings with my computer and then cut the notes down to size.  Of course, my favorite Timeless Type Alphabet had to make its weekly appearance.

Stampin' Up Supplies Used:

Stamps:  None
Ink:  None
Paper:  Play Date DSP, Real Red, Bashful Blue, YoYo Yellow, Peach Parfait, Pear Pizzazz, Going Gray, Early Espresso, Whisper White, Crumb Cake
Accessories:  Dazzling Diamonds

Monday, August 30, 2010

Envelope Bag


Jessica Jones of How About Orange has done it again.  I was browsing her blog and saw these cute bags she made out of envelopes.  They gave me the inspiration to create this Halloween treat bag.  My bag is made from an A7 envelope from Paper Source which is 5.25 x 7.25".  I scored each of the sides and the bottom with a 1.5" border.  It's hard to tell that this bag was originally an envelope, isn't it?

Stampin' Up Supplies Used:

Stamps:  Halloween Hoot
Ink:  Basic Black, Going Gray, Rich Razzleberry, Pear Pizzazz, Pumpkin Pie, Daffodil Delight, Bashful Blue
Paper:  Basic Black, Whisper White
Accessories:  Early Espresso 1/8" Taffeta Ribbon, Aqua Painter

Friday, August 27, 2010

Haunted House Card Box


I made a box to hold my Halloween cards and turned it into a haunted house.  The house uses another set from the upcoming Holiday mini called Dark and Dreary.  The door is the Key Tag Punch (Retired) with one of the rounded sides cut to leave a straight side.  I made the fence by cutting strips of paper and then free form cutting triangles to top each post.  A Haunted House can't have the friendly white picket fence, can it?  The Happy Halloween image is serving as the "gable".  Have a great weekend!

Stampin' Up Supplies Used:

Stamps:  Wicked Cool, Dark and Dreary
Ink:  Basic Black
Paper:  Rich Razzleberry, Basic Gray, Old Olive, Whisper White, Daffodil Delight, Crumb Cake, Basic Black, Peach Parfait, Wicked Fun Specialty DSP
Accessories:  Key Tag Punch (Retired)

Wednesday, August 25, 2010

Sneak Peak: Fang-tastic!


We're days away from the release of the new Stampin' Up Holiday Mini on September 1.  This is a sneak peek of a stamp set called Fangtastic.  I'm a whimsical Halloween lover, not a lover of scary and gory.  Aren't the vampire and witch adorable?

Stampin' Up Supplies Used:

Stamps:  Fang-tastic
Ink:  Basic Black, Rich Razzleberry, Kiwi Kiss (retired), Peach Parfait
Paper:  Rich Razzleberry, Kiwi Kiss (retired), Peach Parfait, Basic Black, Whisper White
Accessories:  Modern Label Punch, Stampin' Dimensionals, Circle Punches:  1 3/8 and 1 1/4"

Tuesday, August 24, 2010

Aviary Duo


I recently discovered a great blog called Birthday Girl where real party scenes or inspiration boards which eventually lead to the birthday celebrations are featured.  I kept seeing fabulous ideas for the perfect party.  I also saw some great inspirations for card making.  For example, this card duo was based on the image below.  Notice the bird cages in the background?


Stampin' Up Supplies Used:

Stamps:  Aviary, Trendy Trees
Ink:  Versamark, Cherry Cobbler
Paper:  Soft Suede, Pink Pirouette, Whisper White
Accessories:  Basic Rhinestones, White Embossing Powder, Modern Label Punch

Monday, August 23, 2010

Vintage Collage Tag


As I've mentioned before I like my designs clean, simple and modern.  However, I am also drawn to vintage, shabby chic and collage designs too.  This weekend it was time to exercise the vintage side of my stamping personalities.  Here's how I made the tag:  start by cutting a label from the Stampin' Up exclusive Sizzix Top Note die.  Next heat emboss the medallion image from the Artistic Etchings stamp set.  Then sponge Blushing Bride onto the medallions.  Because the images are heat embossed, they'll resist taking on any color - this is known as the Emboss Resist Technique.  After that stamp the other images from the set and sponge Marina Mist over them.  Staple Victoria Crochet Lace and the label is done!

Stampin' Up Supplies Used:

Stamps:  Artistic Etchings
Ink:  Versamark, Going Gray, Marina Mist, Blushing Bride, Melon Mambo, Early Espresso
Paper:  Confetti Cream
Accessories:  Victoria Crochet Lace, Jumbo Eyelets, White Embossing Powder

Friday, August 20, 2010

Embossed Organic Outlines


I never sell my retired stamps but that will have to change soon.  Otherwise I may be a great candidate for the reality show on hoarders.  I recently went over my inventory of stamps and separated the current from the retired stamps.  One of the sets I came across was Organic Outlines.  Organic Outlines never took off and retired way too early.  Lately I've been seeing lots of bedding designs like this:


My card is based on the gray, white and yellow/greenish pillow to the right; Organic Outlines had just the right images to mimic the design concept of the pillow.  I'll probably hang onto this set for a while, even though it's retired.
Stampin' Up Supplies Used:
Stamps:  Organic Outlines (Retired), Teeny Tiny Wishes
Ink:  Versamark, Basic Gray
Paper:  River Rock, Going Gray, Basic Gray, Whisper White
Accessories:  Modern Label Extra Large Punch, Circle Punches:  1" and 3/4", White Embossing Powder

Thursday, August 19, 2010

Auction Donation Invitation Prototypes


I mentioned in an earlier post that I donated invitations and favors to my friend's charity auction.  The winning bidder is hosting a Halloween party and asked me to make only invitations, no favors.  Here are two invitation prototypes I created for her to choose.  Both should be fairly easy to mass produce.  Wait, let me retract that.  I just realized the vellum overlay invitation will require 450 punched circles - no stamping though! 

Stampin' Up Supplies Used:

Stamps:  Bitty Boos Too (Retired)
Ink:  Rich Razzleberry
Paper:  Rich Razzleberry, Whisper White, Basic Black, Kiwi Kiss (Retired), Pumpkin Pie, Lavender Lace (Retired)
Accessories:  1 3/8" Circle Punch, Pear Pizzazz Poly Stitched Ribbon

Wednesday, August 18, 2010

It's Everywhere - Dress Forms


I was looking at the Moxie Fab blog site and kept seeing images of dress forms everywhere.  One image piqued my interest and it inspired me to make this card.  Chic Boutique is one of my favorite Stampin' Up sets and it conveniently has a dress form.  I'm not a sewer, so forgive me if my ribbon ruffly skirt looks a little off kilter; but I think it still does the job of looking chic. Growing up, my style has always been casually imperfect.  My sister (and downline), a fabulous cardmaker, however, is very meticulous and lines everything perfectly straight.  I'm happy being off kilter and slightly quirky.

Can you guess what paper I used?  If you answered the In Color DSP pack, you're right!  Don't you think these 3 patterns look like fabric swatches?  It's also shabby chic colors so I scuffed up the edges a bit.  It's hard to see, but I did use 2 rhinestones to bling up the card.

Stampin' Up Supplies Used:

Stamps:  Chic Boutique, Artistic Etchings
Ink:  Basic Black
Paper:  Level 1 Hostess In Color DSP pack, Whisper White
Accessories:  Basic Rhinestones, Very Vanilla 3/8" Taffeta Ribbon

Tuesday, August 17, 2010

Packaged Cookie Favor


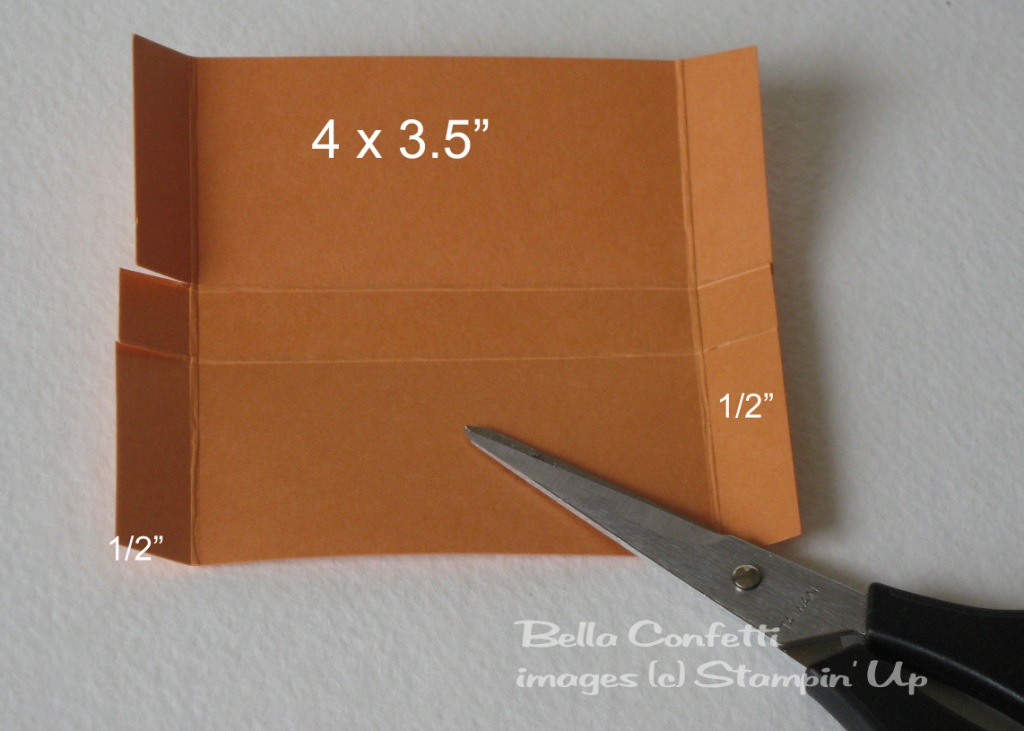
Momofuku Milkbar is a popular bakery in New York City.  I served these yummy copycat Momofuku Milkbar cookies at the Stamp 'n Chat I hosted last week.  I promised everyone in the group I'd post the recipe on my blog.  Instead of just taking a picture of the cookie, I decided to create a cute cookie packaging idea.  The cookie is housed in a simple and quick-to-make box.  Here's what the box looked like during the construction phase:


The dimensions of the box are 4" long by 3.5" tall.  Score at 1.5" on each of the short sides.  Then turn it lengthwise and score at 1/2" on each side.  As the picture above indicates, cut up to the score lines on all four sides.  Attach sticky strip to each side and adhere to create the box.  Attach 4 x 1.5" strips of decorative paper to the front and back of the box.  If you don't want your box to get greasy, wrap the cookie with a piece of parchment paper.  Use medium cellophane bags to package the cookie and tie it with Peach Parfait ribbon.  Before closing the bag, punch out 1/4" and 3/4" confetti circles in Peach Parfait and Melon Mambo cardstock and drop them in the bag.

Here's the recipe for the yummy copycat Momofuku Milkbar cookies.  The secret ingredient is caramelized cornflakes.  There's a recipe that's been posted on the internet, but I made a few changes to it.  This is my copycat of the copycat recipe.

Copycat Copycat Momofuku Cookies:

Caramelized Cornflakes

2 cups cornflakes
6 T milk powder
12 T sugar
1 tsp salt
7 T melted unsalted butter

Preheat the oven to 375 degrees F.  Lightly crush the cornflakes in a bowl.  Mix together the milk powder, sugar and salt.  Pour the butter over the cornflakes and sprinkle the dry ingredients on top.  Toss until evenly coated.  Spread out cornflake mixture on a lined baking sheet and bake for 15 to 20 minutes or until the cornflakes haave a deep caramelized color.

Remove from the oven and cool completely before using. 

Cookies

2 1/2 cups flour
1/4 tsp baking powder
1/8 tsp baking soda
Pinch of salt
1 c unsalted butter
1/2 c + 2 T sugar
1/2 c + 2 T light brown sugar
2 T corn syrup
1 large egg
1 T vanilla
1 package semi-sweet chocolate chips
1 1/2 c mini marshmallows
2 c caramelized cornflakes

Preheat oven to 350 degrees F.  Line baking sheet with parchment paper; set aside. 

In a large bowl, mix together flour, baking powder, baking soda, and pinch of salt; set aside.  Cream butter, sugars and corn syrup.  Add egg and vanilla and mix.  Add flour mixture and mix.  Add in chocolate chips, marshmallows and caramelized cornflakes.  Scoop dough into balls and place about 2 inches apart on prepared baking sheets.  Bake for about 12 - 15 minutes until cookies are golden brown.  Transfer to a wire rack to cool.

Enjoy!

Stampin' Up Supplies Used:

Stamps:  Homemade
Ink:  Peach Parfait
Paper:  Peach Parfait, Melon Mambo, Level 1 Hostess In Color DSP Pack
Accessories:  Medium Cellphane Bags, 2 3/8" Scallop Circle Extra Large Punch, Peach Parfait 1/2" Stitched Poly Ribbon, Circle Punches:  3/4" and 1/4"